Alcohol Stoves
With all the hassle of TSA restricting transport of stoves, fuels, etc for a backpack trip, consider using an alcohol stove instead.
For most three season backpack trips that lasts a few days, cooking is basically heating water for beverages and reconstituting freeze-dried food. It’s not a major inconvenience if the water takes ten minutes to boil instead of five.
Advantages to an alcohol stove:
- Lightweight – especially the “soda-can” ones; typically 0.5 oz (15 grams).
- Easily replaceable if damaged – make another one.
- Stove burns quietly – no “jet plane roar”.
- Alcohol is safe to transport – not considered a fire hazard.
- Alcohol is non-explosive – no fire hazard.
- Alcohol is environmentally friendlier – spillage is not a hazard.
- Alcohol is easily available – most hardware, paint, auto shop carry it.
- Alcohol is cheap – $2-$5 per quart / litre
Disadvantages:
- Alcohol is less energy efficient – it takes twice as much for the same heat.
- Alcohol flame is nearly invisible in daylight – be careful, don’t burn yourself accidentally.
There are many alcohol stove designs on the internet. Most are made from soda cans, catfood cans, etc. The simplest can be made from a Coke can in about five minutes using only a pocket knife.
<<< or you can buy a can of Sterno >>>
Here are some links for the various DIY stoves. (Easiest is “Tom’s Beer Can Stove #2” in the Bikepacking.com link below)
https://en.wikipedia.org/wiki/Beverage-can_stove</a >
https://www.thesodacanstove.com/alcohol-stove/how-to-build.html
http://www.bikepacking.com/gear/hop-can-stoves-how-to-make-5-ultralight-bikepacking-stoves/
Shown below is a more durable stove made from an aluminum water bottle that took about 30 minutes to assemble.

Cut aluminum water bottle: two inch of bottom and 2 inch of the top
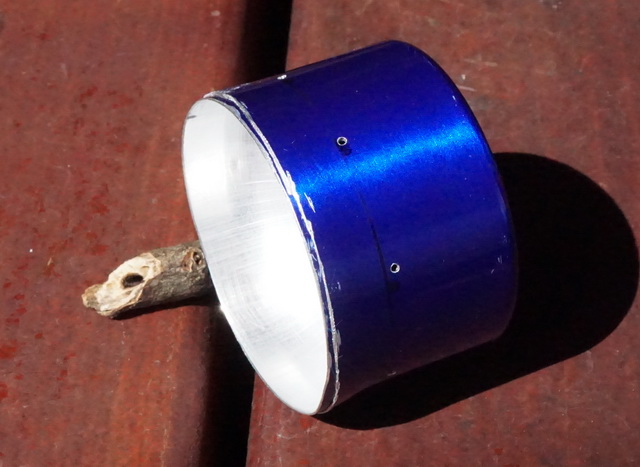
Notch the bottle neck 1/8 inch or so; press top upside down onto bottom segment.
Drill 1/16 inch holes around bottom segment below the shoulder of the top segment. Do NOT drill into the top segment.

For safety sake place stove on a non-burnable surface. Pour alcohol about 1/2 full. That’s enough to burn about ten minutes for 2-3 cups of water.
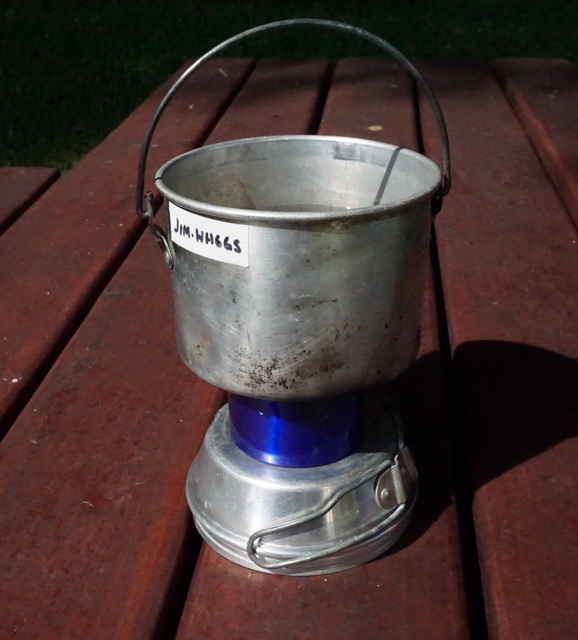
Light the stove, allow 1-2 minutes for it to heat up. You should see bubbles at the bottom of the alcohol. Carefully place your pot to cover the stove. This will force the alcohol vapor to exit through the holes. Ensure the vapor jets are lit and watch the water boil. Enjoy.
Happy trails to you, Jim
![]()